How to add Assets
Last updated
Note:If you would like to upload multiple Assets at once, the only way to do so is from our web app.
In order to add multiple Assets at a time, you first need to format the Asset information using Microsoft Excel or any other authoring tool that can organize tabular data. You can also skip to step 6 and input your data directly into the Assets form.
- Download the latest Asset Import Template.
- Open the downloaded Asset Import Template from the link above.
- Organize all the Asset information according to the column names in Excel. The columns with a red asterisk are required. All columns are explained in more detail below.
Asset Name
Suggested Format: Asset ## where "##" indicates a sequential number of that type (e.g. RTU 01, RTU 02, etc.).
The Asset name should be unique to each Asset.
Quantity
Defaults to 1 unless specified otherwise.
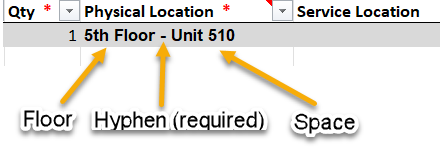
Physical Location (Floor - Space)
Note:Floor and Space are separated by a hyphen and must be formatted this way (e.g. "1st Floor - Mech Room", "01 - Mech Room", etc.).
If you don't have a floor, you can simply enter a Space name such as "Bathroom" with no floor.
Asset Category
Use the Excel template for proper formatting and spelling.
Note:You do not need to use the drop-down menu for uploading multiple Assets.
- Once all the Asset information is organized, go to the Assets page.

- Click Add Assets in the top-right corner of the page.
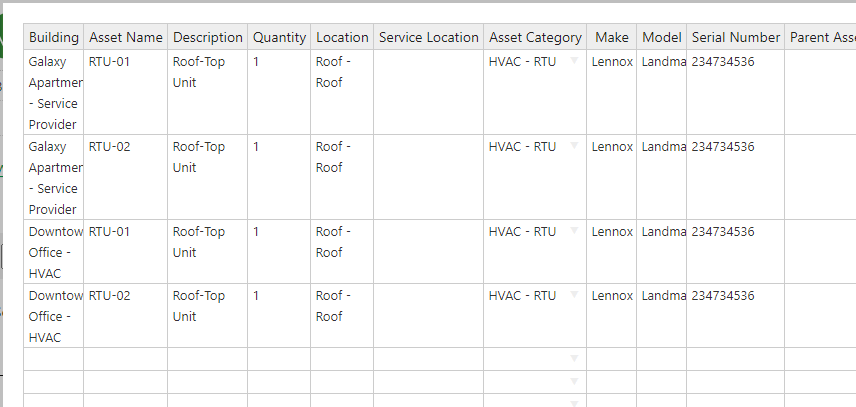
- Copy & Paste all of the Asset information (excluding column headings) from the Excel template to the BuiltSpace Add Asset Dialog window. Here is an example of what this would look like:
- When you are finished, go to the bottom and click Submit.
- The system will begin creating the Assets one by one and you will receive a confirmation when this has been completed.
An Asset is an item that serves a function in/around a building.
In BuiltSpace, assets must be associated with a building, although they may physically exist outside of a building or be movable.